Sunday, February 3, 2013

Dining Chair Do-Over

When boyfriend and I moved in together almost two years ago, we bought this great little kitchen table and chair set from KMart, exactly what a young 20-something couple needs in their first little apartment - inexpensive, basic, and not lopsided.


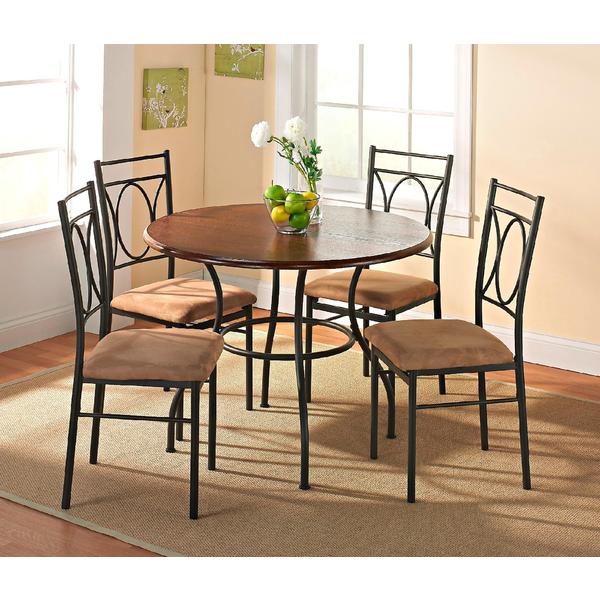
It worked just fine, despite the fact that we never sat at the kitchen table, but the seats, made of a microfiber material, were definitely NOT as easy to clean as advertised. They attracted dust, fuzz, everything, and quickly turned dingy and stained.

Covering seat cushins is an EASY and INEXPENSIVE way to update any space. 

Because in just one year, I became a fully grown adult with a sophisticated style and demanded that our chairs  match our quirky dining room decor (in a new, much larger apartment), I determined to recover these chairs and bring them up to the speed of my Anthropologie table cloth (which I happened to get on clearance for $30, what what!?)

One of the perks of having a wonderful boyfriend interior design student who happens to be interning at Scalamandre is that he gets first pick of the recycle bin - sounds glamorous, huh? It's actually quite amazing for any DIY-er. All discontinued fabrics, old samples, scraps, etc. get tossed into a giant bin, and he can sometimes nab a good 7 ft-long piece of Scalamandre fabric, that would retail for about $500.00. And to think, little me with curtains that may be discontinued, but technically cost $500? What a good, good boyfriend I have.... ;) Not to mention their gorgeous wallpapers, and sometimes even furniture from the other designers with showrooms in the Merchandise Mart, it's a pretty sweet deal.

My boyfriend found these gorgeous fabrics, not for Scalamandre this time, but from a textile designer down the hall, Highland Court. They were the perfect size to fit over our gunky microfiber seats.

Before: gunky microfiber


And recovering the chairs was so easy, anyone can do it with a little bit of fabric and a staple gun.

Position the fabric over the seat, fold over the edges, and staple away! You have to be a little particular with the corners, tucking the fabric just so. We were lucky to have assembled these chairs ourselves, so the cushions unscrewed easily from the legs.

After: pretty chairs

These chairs are just begging us to not eat dinner in front of the TV. We'll see if that happens. We may have nice chairs now, but we're still in our early twenties...


I'm so happy my boyfriend has introduced me to the world of luxury fabrics. I'm never going back to microfiber. Ever.

Saturday, February 2, 2013

Floral Print

I can't wait for spring to hit, so that I can bust out a few of these extra feminine/glam floral prints.

 This clutch by Loeffler Randall is definitely being added to my wish list - tax refund, come quick! $295.00


And one more option by Loeffler Randall, for $395. I love the red/orange accent of the top and strap. 


 So I'd never actually wear this dress from Moschino, but how fun!?! Totally a fan of bringing retro back.

Trousers from Madewell, on sale now for $44.99. What are your thoughts on giant-print pants? Cool accent, or a bit too loud?  But they're on sale, if that's your thing..

Gorgeous J.Crew dress that would be perfect for spring wedding season, don't you think? $275.00, maybe this is your one investment dress for those 5 weddings you'll have to go to over a 3-week period. 


And slightly more budget-friendly, these adorable keds would look great with a pair of jeans, or a cute spring dress! And now on sale for $24.99!

What are your thoughts on flowers this spring? Little ones okay? Big prints too much? Or love 'em all??


Enhanced by Zemanta

Friday, February 1, 2013

Bright, Fresh Coconut Key Lime Squares

So much baking this week, I love it!
I'm on to my last actual day of vacation, and I've been cooking up a storm, making all of those recipes that I just can't find the time to dig into during a typical work week.

These super citrus, fresh, bright coconut key lime bars are perfect for brunch, a quick morning treat with some hot coffee or just because! They make your typical lemon bar look a bit ho-hum.


I found this recipe via Martha Stewart Living Magazine a while ago, and have been holding on to it for far too long. Little bits of white chocolate make the crust a perfect sweet counterpart to the tart limes. I couldn't find key limes in the dead of winter, so I used regular limes, and the taste was perfect. The coconut didn't stand out too much, so if you're not a coconut fan, don't be discouraged. And if you love yourself some coconut, maybe sprinkle a bit on top of the bars, or add extra to the crust.

And my boyfriend said that these may be the best treat I've ever made...score!


Martha Stewart's Coconut Key Lime Squares
Takes about 1 1/2 hours to make, and you can make these a day ahead, too

Ingredients

  • Crust

    • 6 tablespoons cold unsalted butter, cut into 1/2-inch pieces, plus more, softened, for pan
    • 3/4 cup all-purpose flour
    • 3 tablespoons light-brown sugar
    • Rounded 1/4 teaspoon coarse salt
    • 1/2 cup finely shredded desiccated unsweetened coconut
    • 3 ounces white chocolate, coarsely chopped (about 1/2 cup)
  • Filling

    • 3 large eggs, room temperature
    • 2/3 cup granulated sugar
    • 3 tablespoons all-purpose flour
    • 2/3 cup fresh Key lime juice or regular lime juice
    • 1 tablespoon confectioners' sugar, for dusting

Directions

  1. Crust: Preheat oven to 400 degrees. Lightly butter an 8-inch square baking pan. Line bottom and 2 sides of pan with parchment, leaving a 1-inch overhang; lightly butter the parchment.
  2. Combine flour, brown sugar, and salt in a food processor, and pulse a few times to combine. Add butter, and pulse until largest pieces are the size of peas. Add coconut and white chocolate, and pulse a few more times, just until mixture holds together.
    Transfer mixture to pan, and pack down firmly with the bottom of a measuring cup. Bake until crust is deep golden brown, 18 to 20 minutes. Remove from oven, and reduce heat to 300 degrees.
  3. 3.  Filling: Whisk together eggs and granulated sugar in a bowl, then whisk in flour. Gently stir in lime juice (do not whisk or stir vigorously or batter will become foamy).\

  4. Pour filling over hot crust, and bake until filling is set, about 15 minutes. Let cool completely on a wire rack.
  5. Run the tip of a knife along the 2 sides of the pan not lined with parchment, then remove from pan by lifting with parchment overhang. Transfer to a cutting board, dust with confectioners' sugar, and cut into 1-inch squares.


Tuesday, January 29, 2013

Easy Peasy Flourless PB Cookies

These super easy, gluten-free peanut butter cookies made it into my first vacay day. The recipe has been sitting in my recipe binder for a LONG time, and it was a simple but yummy, no-fuss recipe. If you're looking to do some baking after work, this recipe would be a good pick, as it uses minimal ingredients, minimal equipment, and bakes quickly. And since they're flour-free, that co-worker who's super trendy and refuses to eat gluten has no excuse. (And the people who actually can't eat gluten will be grateful). Ta-da!


Real Simple's Flourless Peanut Butter Cookies
Makes 36 cookies| Hands-On Time: 10m| Total Time: 30m

Ingredients

  • 2  cups  creamy peanut butter
  • 1  cup  packed light brown sugar
  • 1  cup  granulated sugar
  • large eggs
  • 2  teaspoons  baking soda
  • 1/2  teaspoon  kosher salt

Directions

  1. Heat oven to 350° F. Line 2 baking sheets with parchment. In a large bowl, mix together the peanut butter, sugars, eggs, baking soda, and salt until smooth.
  2.  Shape the dough into balls (about 1 heaping tablespoon each) and place 2 inches apart on the prepared baking sheets. Using the tines of a fork, flatten each ball, creating a crisscross pattern.
  3. Bake, rotating the baking sheets halfway through, until puffed and golden, 10 to 12 minutes (the cookies will deflate as they cool). Let cool slightly on the baking sheets, then transfer to a wire rack to cool completely.
 
You can also get creative with some add-ins, if you'd like. After baking half of the cookies, I added pretzels and toffee to my dough. You could also mix in rolled oats, dried cranberries, or chocolate chips.


Ellie wasn't even hiding the fact that she was waiting for me to drop some cookie crumbs her way.


Monday, January 28, 2013

Vacay Week!

Last week was SUCH A LAZY WEEK. Every night I came home from work and crashed...missed two nights of work outs, and ate frozen TJ's pizzas a few too many times. Now I'm even more thankful that I was planning to take this week off work, have a little personal stay-cation week in ol' Chitown.

I've got a look of cooking and baking to catch up on.
Last night I finally made these grilled fennel crusted pork chops. I wasn't the biggest fan of the carrot salad on the side, but pork/fennel is a beautiful combination. If you haven't tried it, please do! Just smash the fennel seeds a bit, crack 'em up, to release a little more flavor, and season your pork with salt, pepper, and the fennel. That's all it needs.

Today I'm catching up with this creamy chicken and spinach pasta I was supposed to make last week...woops.

In my free time, I'm hoping to work through a few dessert recipes. I have a giant  accordion file folder that I sort my recipes in after ripping them out of magazines, printing off line, and scribbling on napkins. Boyfriend doesn't believe it's actually organized, but I swear it is, by breakfast, lunch, dinner, sides, desserts, and etc. It weighs about 8 lbs. so I need to have a big baking spree and tackle a few desserts this week.


There are so many good dessert recipes out there, but who ever finds the time to make dessert? Definitely not during the week, that's for sure. We need more cookies in our life. ASAP.

I'm just home from teaching my 6AM spinning class, starting the week off right! Only other goals today would include taking 3 big bags of clothes to the donation center and starting this throw, or at least getting the supplies for it. And I have to finally finish 1Q84, the book I've been reading. I'm so close!

Sunday, January 27, 2013

50% off J. Crew Sale! Boom!

 So by now J.Crew has been blowing up your inbox with their extra 40% off sale items promo. But what they're NOT telling you is that if you GO INTO a J. Crew, they're giving 50% off sale items, in store only! Boom. So get off the couch, hop on the el, the bus, in the car, and get there.

I went to J.Crew on my first day off. The sale was a bit picked over, but with an extra 50% off, I knew I could find something.

I picked up this two-toned pink color block Oxford for $20. Boom! I can only wear a few button ups alone, without a sweater over, because I'm, well, "blessed" up top. But I'm happy to say, this one looks great alone or under a sweater.

This soft blue bling button cardigan was only $20, too! Another score, you can never have too many cardigans. And this one is so light, it could easily be worn in the springtime over a dress. I only found these in XS, but luckily the XS fit well! And let me repeat, only $20! A J. Crew cardigan for only $20, you can't beat it. 


I also picked up this necklace, in my recent efforts to build up my jewelry arsenal and wear legit jewelry. Because I had none. Until now. This necklace was only $39.50, in store. Not bad for J. Crew jewelry!


I don't think any of these pieces are available online anymore. But remember, extra 50% if you hop into the store!!


And can we take a moment and discuss the downward spiral that is J. Crew Factory Online? I've only ever shopped J. Crew factory via their website. A few months ago, they had that giant website overhaul, and basically since then, I feel like there has been no selection on that site. Not that it's been a bad selection, but they have about 30 items listed on that site to buy, total! Why is that? And it also feels a little more expensive than before their website re-design. Any thoughts? Do you agree, or am I just being a spoiled brat?


Saturday, January 26, 2013

Salty Chocolate Chunk Cookies - Sounds Weird, It's Not!

Last month's Bon Appetit had an entire section on salted desserts - YES!
I'm such a sucker for salted caramel, salted chocolate. That little pinch of salt adds and brings out so much flavor, it's ridic. I'm going to work my way through all of those recipes, but I started out with these Salty Chocoalte Chunk Cookies.


A few notes: I used chocolate chips instead of chocolate chunks - time saver in chopping that chocolate. I also used Hawaiin Black Lava Sea Salt instead of a Maldon or flaky salt, because we had it lying around, for some reason. You can use any brand of sea salt, as long as the flakes are big.

Also, bring your butter and eggs both to room temperature before you start. This keeps your cookies fluffy so they don't collapse while cooling.  My boyfriend LOVED these, and his friends took a few home.

This recipe makes about 25.

Ingredients

  • 1 1/2 cups all-purpose flour
  • 1 teaspoon baking powder
  • 1/2 teaspoon kosher salt
  • 1/4 teaspoon baking soda
  • 1/2 cup (1 stick) unsalted butter, room temperature
  • 3/4 cup (packed) light brown sugar
  • 1/2 cup sugar
  • 1/4 cup powdered sugar
  • 2 large egg yolks
  • 1 large egg
  • 1 teaspoon vanilla extract
  • 8 ounces semisweet or bittersweet chocolate (do not exceed 72% cacao), coarsely chopped
  • Maldon or other flaky sea salt

Preparation

  • Place racks in upper and lower thirds of oven and preheat to 375°. Whisk flour, baking powder, kosher salt, and baking soda in a medium bowl; set aside.
  • Using an electric mixer on medium speed, beat butter, brown sugar, sugar, and powdered sugar until light and fluffy, 3-4 minutes. Add egg yolks, egg, and vanilla. Beat, occasionally scraping down the sides of the bowl, until mixture is pale and fluffy, 4-5 minutes. Reduce mixer speed to low; slowly add dry ingredients, mixing just to blend. Using a spatula, fold in chocolate.


  • Spoon rounded tablespoonfuls of cookie dough onto 2 parchment paper-lined baking sheets, spacing 1-inch apart. Sprinkle cookies with sea salt.


  • Bake cookies, rotating sheets halfway through, until just golden brown around the edges, 10-12 minutes (the cookies will firm up as they cool). Let cool slightly on baking sheets, then transfer to wire racks; let cool completely. DO AHEAD: Cookies can be made 1 day ahead. Store airtight at room temperature.

    Isn't baking the perfect Saturday afternoon activity? I kind of love it. 
    I'm going to tackle these after I teach Body Pump this afternoon.